
Installing a 12V Tape Wire Electrical System
- Tape Wire Systems are easily adapted to miniature projects. This system enables you to efficiently run your wiring under flooring and wallpaper. Ideally you will install your wiring in a basic structure with no stairs, doors or windows have been added yet.
A good reference book for installing and maintaining dollhouse wiring is the book: BOY134-DOLLHOUSE-LIGHTING-ELECTRIFICATION-IN-MINIATURE.
Supplies needed:
A pre-packaged dollhouse wiring kit*
Scissors
Pencil
6” ruler
Plastic card such as a credit card
Small screwdriver
Scotch Brand Magic Tape
*You will determine which size Wiring Kit will accommodate your project based on the transformer. A transformer powers a certain number of light bulbs. Estimate your projected fixtures. Keep in mind that some fixtures have multiple bulbs. Each individual bulb counts on the transformer. See the chart for bulb count for several common 12V transformers.
Installation:
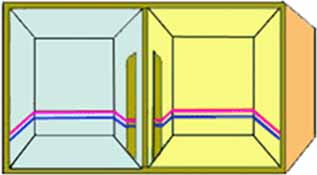
Start by holding the ruler flat against the lower right side wall resting on the floor. Using the ruler as your guide, draw a pencil line around the perimeter of each room. Suggestion: label the ruler for future use as the guide for wiring.
The Tape wire is 2 runs (+,-) of copper, which is the conductor of the electricity. It is covered with a plastic protective coating. Peel a few inches of the paper backing to reveal the sticky side. Leaving a few inches of excess tape hanging outside the project, place the sticky side down below your pencil line on your wall. Continue peeling the paper backing a few inches as you place the tape. Use the plastic card as you go to firmly and smoothly place the tape along the line. The edge of the card will also enable you to push the tape sharply into the corners.
Run the tape as far as you can go in one run. Wrap it around wall edges to go from room to room. The tape must be flat and straight. When you come to a place where you cannot continue (example is around the front door opening) cut the tape off the roll with the scissors. Continue on the other side of the opening with another run.
 |
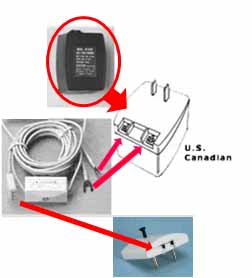
Remove the screw from the junction splice. Decide where you would want your cord to hang from your project. Place the sharp prongs into the tape wire; one prong into each side of the tape. Attach the U ends of your lead in cord under the 2 screws on your transformer. Plug the transformer into an outlet and the small plug end into the junction splice.
 |
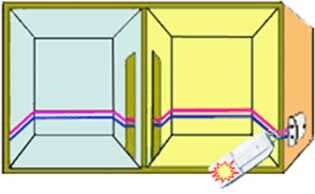
Remove the cap of the test tool. Place the sharp prongs firmly into the tape a few inches from the junction. Turn the switch on. The test tool should light. If you do not have power, continue to adjust your junction spice until the tester lights. Screw the junction in place when you know your first run is working.
Turn your power cord off.
 |
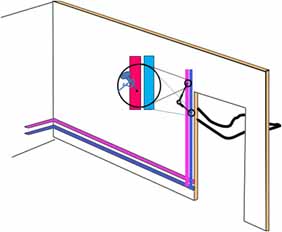
Each run needs connected the next. Ideally a strip run up through the stairwell to cross over the tape runs connects floors to connect tape for doorway openings run tape connections on the floors.
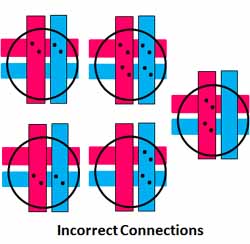
With it being now a continuous run of tape, the copper strip needs connected where the plastic rests in between in order for the copper touch together to conduct the power throughout.
Using (2) brass brads or (1) brass eyelet, connect the tape each side of the strip at all overlaps. THE MOST IMPORTANT PART OF THE CONNECTION IS TO CONNECT THE PINK TAPE TO PINK TAPE, AND THE BLUE TAPE TO BLUE TAPE. Connecting it incorrectly will short your system.
With a needle punch, pierce starter holes for the connectors. Using either small needle nose pliers for brads or an eyelet insertion tool for eyelets, force the brass connectors into the holes. This enables both pieces of copper to connect.
 |
 |
After each connection test your run with the transformer turned on and the tester pushed into the tape. Use a small piece of Scotch Brand Magic Tape over the connectors. This will hold the connectors securely when applying wallpaper or paint. This brand of tape as the least amount of adhesive acid and will not age under wallpaper.
Connecting Various Light Fixtures:
Table Lamps and Floor Lamps
Most Table Lamps and Floor Lamps come with a plug attached. Choose outlets to accommodate the plugs. The outlets are placed anywhere you have tape run. There are two prongs on an outlet; one prong is placed in each side of the tape. These outlets may be installed at anytime. Using the saved Ruler, you can rest the ruler against the wall to know where your wire is under wallpaper. Use your test tool to locate the correct placement of the outlet.
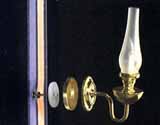
Sconces and Ceiling Fixtures:
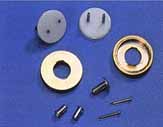
There are 2 options to running tape for sconces and ceiling lights. You can attach tape to the wall strip and go up the wall where the sconce will be placed, or up the wall and across the ceiling where the fixture will be placed. Remember to add brass connectors to the overlap. Using a Sconce Adapter or Chandelier Adapter, the fixture can be wired directly into the tape.
 |
 |
 |
The second option is to drill a hole where you want your fixture placed and connecting the wire to the copper tape. The lamp wire is then brought through the hole and connected to tape. This allows easier coverage of tape with wallpaper or flooring. With a Sconce this connection can be made on your original wall run; with a ceiling fixture run a piece of tape on the floor above the fixture.
 |
To directly connect a lamp to tape wire without an adapter, cut the plug off the fixture. Carefully divide the two sides of the coated wire without exposing any copper filaments. Practice on the piece you cut off. It is imperative not to have any copper exposed when these two threads are pulled away from each other. Next using your fingernails or a miniature wire stripper, pinch and pull the white coating off of each end about ¼” exposing the filaments. On each thread, twist the filaments tightly together. Cut the very tips off to create a blunt edge. Using your hole punch, punch a hole into each side of the tape close to where the lamp will be placed. Take the exposed copper tip and place it down into the hole. Force a brad or eyelet down in the hole with the tape to hold it in place. Repeat on the other side with the other thread. Test the lamp. If all is working, tape any excess wire down tightly with Scotch tape and tape over the connectors.
For additional wiring information such as Flickering bulbs, Christmas lights, Wall Switches, etc. refer to the suggested book: BOY134-DOLLHOUSE-LIGHTING-ELECTRIFICATION-IN-MINIATURE : We are also available to discuss your wiring project by calling during our business hours.
